Image Map
Showing posts with label kitchen. Show all posts

6.11.2014

40 Day Summer Challenge: Cleaning the Oven


Last Monday I posted about my 40 Day Summer Cleaning & Organizing Challenge. I've already crossed off 7 items. Today I'm blogging about how I clean my oven without using harsh chemicals. This was the first thing I crossed off the list. I hadn't cleaned my oven since I moved into my apartment last July. It was starting to smell awful when I'd turn it on...like something was burning. Not good.

I used to hate cleaning my oven. The nasty chemicals that you'd have to spray after preheating the oven and blah blah blah...so gross. Then I discovered Shaklee Scour Off. All you have to do is wet a sponge or cloth and wipe the putty all over the areas that need to be cleaned. Let it sit for 10 minutes and wipe off. If you use a scour pad, the tougher gunk comes off with easily with a little bit of scrubbing. Check out my before and after photos below.


6.21.2012

A Problem, A Solution, & A Decision for Change

This is a multi-story post. Bear with me. {Yes, this is the correct "bear" in that phrase. I Googled it.}

A Problem

We decided to eat healthier. We, as in Chris and I, together. We bought fresh fruit, quite a bit, to make a fruit salad. Usually we buy bananas or apples and that's the extent of our fruit buying. Our fruit bowl has been mostly used to hold grain products - buns, tortillas, rolls, bagels, etc. Well, the left over fruit doesn't fit nicely with the grains. That is a problem for me. It makes us both stay away from the whole situation in fear of dumping the whole bowl.


I decided I wanted to put the grains in the cupboard. Good luck finding room with the cupboard's current condition...


A Solution

I spent time rearranging, organizing, cleaning, searching for expired food, etc. I am pleased with the solution. The fruit gets its own bowl.


The grains go into a basket in the cupboard. Perfect.


Everything is now organized and easily accessible. Let's hope I can keep it this way all summer. =]

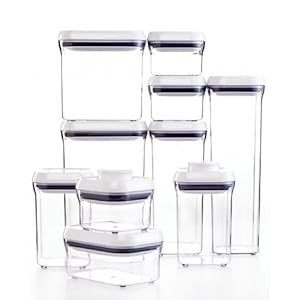
I'd love to buy this OXO Good Grips 10-Piece POP Container Set. It's $98 on Amazon. Amazon always has the best prices on everything, from what I've found over the last 5 years. It's just so expensive for 10 containers. I want something to store pasta, rice, snacks, chocolate chips, etc. Any suggestions for something similar to these, but cheaper?


A Decision for Change

I have recently decided - partially with Chris, but mostly on my own - to make a change. Well, not just a change, but several.

#1 - I want need to be healthy - and fit. I'm not looking to specifically lose a certain number of pounds. I want need to feel better about myself mentally and emotionally, and feel physically better. I sit for far too long every day, especially now that it's summer and I'm not teaching. I'm still working this summer - on my blogs, on my TPT files, on my Etsy files, etc. - but I'm not active. My hypothyroid just plain sucks and I'm not going to let that be an excuse anymore for why I am physically unfit. So with being more active, I'm also changing the way I eat. I know both of these changes will make me feel better each day and I'll have more energy. It's a good change. I'll post about what I'm going for this change next week.

#2 - I want need to stop biting my nails. Such a gross habit, I know. It's a boredom thing, I think. I often catch myself doing it without knowing. It makes it even more gross when I do it at school while working with kids. The germs that have to be under those nails. *blah* Plus, I have a mani/pedi combo gift certificate from a student that I'd love to use to it's full potential - not on nasty gnawed down nails. I've tried the nasty tasting nail polish - that doesn't work for me. Any other ideas for me would be greatly appreciated. =]

#3 - I We want need to create a budget, stick to it, and pay off debt. This means meal plans (once again), a realistic money map (hate the word budget), cutting costs, less going out (of course), and more saving and paying more than the minimum on student loans. I don't think we've ever been able to stick to a budget for a whole month. It's time to become adults and just do it already. We're still stuck in our adolescent mindset here.

#4 - I want need to simplify in all areas of my life. I feel like I have too much "stuff". Too many clothes, too many purses, too many gadgets, etc. It's just overwhelming, really. I can't make a decision on what to use when I have more than one. And then when I'm using more of something else and rarely using the other, I just feel like "what's the point of keeping both/all of them"? For example - I have two Kindles. One e-ink and the Fire. Two different Kindles, same concept. I should get rid of the e-ink one, I guess, but what am I supposed to do with it? I'm not going to donate it or just give it away. I could sell it, but for what? It's almost not worth it to sell it. I even have the first generation Kindle that just sits in my closet. I'll never use that one again. I have some decisions to make regarding my clutter over the next month.

Have you recently decided to make any big changes in your life / home?

4.12.2012

Have 10 Minutes? Declutter Your Cups & Food Containers

Sometimes clutter can overtake kitchen cabinets just as easily as a desktop. Pieces to sets of cups or food storage containers can get broken or become worn out, causing us to toss one piece and not the other half. Now's the time to get rid of the extras.


Now some of you may think, "but what if I can use the 10 extra lids I have laying around eventually, like if one breaks or gets lost". Then just keep one extra if that's your argument. Many of us have way more food storage containers then we'll ever use anyways. I'm guilty.

Today's challenge is to take 10 minutes to go through your cups and food storage containers, looking for the following, and then donating, recycling, or throwing away the culprits:
  • cracked or chipped cups
  • orphaned pieces to sippy cups and cups with straws or lids
  • storage containers without lids...
  • ...or lids without storage containers
  • storage containers that you've never used...and never will
  • cups you no longer use
  • anything that's mismatched that you won't use because it "doesn't belong" (I know some people who have this problem...if it doesn't match, it won't be used)
Teachers may be able to use storage containers that are in good condition, even without the lid. I use these in my classroom to organize my supply cupboards and for art supplies when doing projects. Many donation centers will take anything that's not broken. Don't feel like you have to throw everything you come across away. =]

Good luck!

4.10.2012

Have 10 Minutes? Clean Your Coffeemaker

Last weekend I deep cleaned my coffeemaker...for the first time. So gross.


Here are the steps I took to deep clean my coffeemaker. Now, keep in mind that the total, overall length of time to do this will be 10 minutes, but it will only take about 10 minutes of your time to actually set it up for the cleaning.

#1 - Empty/clean out the filter basket and coffeepot.
#2 - Fill your coffeepot with 1 part white vinegar, 2 parts water and pour it into the coffeemaker. Put a new paper filter into the filter basket to catch all of the loosened junk.
#3 - Brew the water and let the coffeemaker run through the full brewing cycle.
#4 - When the cycle finishes, unplug the coffeemaker and let it sit to cool down (about 15 minutes).
#5 - Dump out the water/vinegar mixture from the coffeepot. Throw away the paper filter.
#6 - If the inside of your coffeemaker has brown coffee stains all over, now would be a good time to clean these (if you want). The water vapor inside the machine has vinegar in it, making it a good cleaning solution for the stains. I used a Q-tip to clean the hard to reach places, dipping the Q-tip in the hot water/vinegar mixture that was in the coffeepot.
#7 - Repeat the cycle with water only two more times to clean out any vinegar that was left behind. You may continue to see more crud come out into your filter, so you can put in a new one if you want. I don't use paper filters, so I only have the 3 that came with the machine. I didn't want to waste it, so I just cleaned out the filter basket after the two water-only cycles.
#8 - Run your coffeepot and filter basket(s) through the dishwasher.

Okay...so it may take you longer than 10 minutes...but it's worth it. =]

4.03.2012

Have 10 Minutes? Clean Your Refrigerator

Isn't it amazing how a refrigerator can collect so much nasty hair, dust, and other grossness, considering it's "closed off" from everything? I'll admit...I'm a clean freak. Not as much as I used to be, but, for example, I always make sure that food products don't get nasty around their lids/openings. If they do, I promptly clean whatever it is up. I don't like stickiness or grime.

But anyways...my refrigerator was looking a bit grungy. Spilled food hidden under containers, hair/dust under the crisper drawers, stickiness all around. It was time to take 10 minutes to wipe everything down and throw out the old food (which surprisingly there wasn't much of this time around).

Now, before you say/think, "that doesn't look that bad", I'm not going to take pictures of all of the grossness going on in there. Those aren't pictures I want on my blog. The one before picture below is not the worst of it, it was the least-gross example I could show.


So I literally just took 10 minutes to clear off the shelves on the door and wipe them down. I didn't see any gunk on the wire racks, so I didn't clean them. I wiped down the bottom shelf and took out the drawers to clean underneath. I also wiped the rubber seal (around the door frame) to clean out the crumbs that had collected in the fold. Super quick and easy.


Since it can be easily forgotten about, take 10 minutes to go and clean your fridge today. =]

2.27.2012

Have 10 Minutes? Organize a Kitchen Cupboard

On Saturday morning I decided to clean out two of my kitchen cupboards. They were a mess - full of food that was overdue to be disposed of and needing some organizational direction. My process took more than 10 minutes because I took inventory of everything with my new Out of Milk app on my phone. It was so nice to be able to scan the bar code of everything, rather than typing it all in. Now I'll have my list on the go when I need it at the store. Chris and I are working really hard at getting organized with meal planning to save some money. More on that in a different post to come.

Here are my before and after pictures from the two cupboards I cleaned out.


I threw out two grocery bags full of expired food. It makes me sad that it's wasted, because some of it was unopened. We'll get better at this, I promise. =]

So take 10 minutes today to organize a kitchen cupboard that's driving you nuts. Clear everything out. Organize things in a way that makes sense. All of my unopened "extras" went up top (I'm 5'2", so anything on the top shelf is hard for me to reach), along with the occasionally used baking supplies. Everything on the bottom shelf are all things that I use often and need to access easily. The quick meals basket includes packets/seasonings for meals such as tacos, Shake & Bake, Pasta Sides, fajitas, beef stew, etc.

If you have more time and/or feeling adventurous, clean and organize all of your cupboards or pantry, too. Good luck!

I'd love to hear what you've accomplished with this quick task. If you have any tips, please be sure to share! And if you have a blog and have posted pictures of your kitchen/pantry organization, I'd love for you to share the link. Everyone loves a little inspiration.

11.28.2011

Organize: Under The Kitchen Sink

So many readers have been asking about organizing under the kitchen sink. This hasn't really ever been an issue for me - and maybe because I don't access it a ton. (I should clean more than I do.)

The space under my kitchen sink isn't that big. I have an obnoxiously large sink with no divider (which drives me nuts...hence why I don't do the dishes by hand). I also have a food disposal. Not much room left. Here's what it looked like under my sink before "cleaning" it out.


I have two caddies under my sink. I don't ever take them out to tote around the house with me, so I suppose a regular plastic basket would also do. I do like the compactness of the caddies though. I sort everything under my sink and put like items together.


This small stackable shelf is my favorite thing under the sink. It makes towels and cleaning accessories easily accessible and fits nicely in the front of my space.


please excuse the ghetto tape job on the wall...lol
There's not much to it for my under the sink space, but here are some tips for you...
  • Use command hooks to hang what you can on doors or the wall - it makes things easily accessible and doesn't take up valuable surface space needed for cleaning supplies.
  • Purge - seriously. Get rid of what you have extra of if you don't have the room to store it under your sink. Or store it elsewhere. This space is meant to be easily accessible and not to store every odd and end you can't find a home for. Since sinks can be leaky or troublesome at times, you don't want to have to haul out a ton of junk just to wipe up a drip.
  • Look around your kitchen for drawers/cupboard space you could store things in that don't need to be under the sink. If I had an extra drawer, I'd be storing my towels there rather than under the sink.
  • Keep cleaning supplies in a container/basket/etc. - if they leak, they won't ruin the cabinet. Also, if you need to remove everything from under the sink because of an issue (such as a leak), you can do so a lot faster since everything's containerized.
the towel that hangs on my cabinet door...love it

For more ideas and tips, visit the posts the following blogs have previous written on this topic:

P.S. Thank you so much for all of the ideas for the 2012 monthly challenge - I have a ton of ideas to get us organized in the new year. Please, keep them coming if you have more ideas!

10.05.2011

October Project: DIY Paper Pockets

Love this post and want to see more like it? Each month through 2012 I will be tackling different topics and creating free printables to go along with the project. View the projects here.


On Monday I announced that I'm going to be tackling a month long paper and digital clutter project.


Yesterday I took the time to update a project I completed back in August. I absolutely love my magnetic recipe holder that is on my fridge. The only problem: it wasn't durable enough for weekly use. I decided to try something that I really thought wasn't going to work, but luckily it did. =]

Here are the old recipe pockets:


And here's how I created the new ones...

I made the larger one first to see if I could even get it to work. So I didn't take pictures of the process of making this particular one.


Step 1: pick out coordinating paper.


Step 2: mark the exact size of your largest recipe (in this case, the pocket I'm making is for the small, 4x6 cards) on the back of the paper. (Yes, this recipe is for real. My step-mom gave me a bunch of easy, common-sense recipes a couple years ago. They're not common sense to me, even now. I struggle in the kitchen. lol)


Step 3: take a piece of card stock (or any other paper really, but card stock will be durable) and line it up under the colored paper you're using. I found it's easier if you cut them together. This ensures the same measurements all the way around on both. My paper cutter = best investment ever, especially when it comes to clipping the hundreds of coupons I print ever month (no joke).


Step 4: cut about an inch larger than where you drew your lines on both sides. This allows you to get your recipes in and out of the pockets without a lot of problems. If you trim the exact size and laminate, then it will be too tight to fit your recipes in.


Step 5: take the recipe card again and line it up on the card stock so that some of it is above the card stock (see the picture below). You can have your card stick out as much or as little as you want. Mark the bottom of the card stock only and cut the bottom portion off (don't do this on the colored paper).


Step 6: take the card stock and line it up with the colored paper. Fold the excess portion of the color paper over the card stock. This creates a pocket to hold your recipe in so it doesn't puncture through the laminate. Once the flap is folded over, your pocket should all be the same size all the way around. I used double sided tape to stick my flap down, but you can use glue or whatever else you want.


Step 7: take a laminating sheet and line up your paper at the very edge. You want your opening to be at the edge so it doesn't get laminated shut, but not over the edge so that you have paper hanging out.


Step 8: send it through the laminator.


Step 9: trim the extra laminate off. I left about a half inch around the edge so that it wasn't trimmed too close.


Step 10: When you trim, it makes a sharp corner, which I don't really care for. So I used my edge rounding punch to take care of that problem. If you want to do this step, then that's another reason to leave an edge around the pocket when you cut off the extra laminate. If you cut too close and then edge the corners, you may puncture the paper and then the laminate won't be over the corners.


Step 11: test to make sure you can still get your recipes in and out.


Step 12: attached the smaller pocket to the larger one. I used double sided tape. You can use whatever you want, of course.


Step 13: label the pocket. I was going to use scrapbook letter stickers, but I didn't have enough "e"s in my white letters. I used my Cricut Expression machine to cut vinyl letters out. I cut them at 1".


The cartridge I used was Lyrical Letters.


Step 14: add magnets to the back of the pockets.


Step 15: hang it up!


I'm sure there are plenty of ways to use these pockets around the house. I'm just getting started. When I come up with more ideas, I'll let ya know.

Enjoy your Wednesday!

LinkWithin

Related Posts Plugin for WordPress, Blogger...